Showing posts with label Tasty Kitchen. Show all posts

Tuesday, April 24, 2012

Sophie In Wonderland: Menu


Our Tea Party menu was a mix of some things you would find in a traditional Afternoon Tea, and some things that you would find in an Americanized type of Tea.  For example: Pink Lemonade.

01b copy

We just had to have something in little “Drink Me” bottles.  It would not have been right to skip this little nod to the movie. These tags were printed on cardstock and attached with glue dots.  It would have been a lot of work to tie these to each bottle, but the easy glue dots give the same effect when you place them at an angle.  FYI: These are Starbucks Frappuccino bottles.  These are so cute with homemade labels.  That wouldn’t work with the “Drink Me” labels, maybe next time.

drink

01

At the main table, each place setting included the lemonade and a plastic tea cup.  The plate holds a small cup of Strawberry Bisque, a prepared scone and an Egg Salad Sandwich.  If we had wanted to be more authentic, the crusts would have been cut off.  Sorry.

09 copy

The center of the main table held a towering display of Cream Puffs and Mini Éclairs.  Yum!

08 copy

Cake stands held the cupcakes at both ends of the main table.  You shouldn’t be surprised that they are The Best Cupcakes Ever!  These are topped with blue Sixlets bought at Party City.

02 copy

The buffet table held all the same treats as the kids’ table, with the sandwiches being traded for mini quiches. 

03 copy

There is the tea, of course.  Oh, and there are some Easter M&Ms tucked in there too!

05 copy

The center of the table showcased the little scones, “clotted cream”, strawberry jam, and lemon curd.  This allowed the adults to make their scones as they liked.

04 copy

You can find the recipe for my Strawberry Bisque HERE.  It’s served in a punch bowl Nana has handed down to me.

06 copy

Classic Scones

This recipe was given to me by a lady in Scotland.

Makes 24 2-inch Scones
 
Ingredients:
1 3/4 cups Self-Rising Flour
2 Teaspoons Baking Powder
3 Tablespoons sugar
4 Tablespoons Unsalted Butter, cold
1 Large Egg
1/2 Teaspoon Salt
2/3 Cup Whole Milk, (You will not need all of it)

Preheat oven to 425 degrees.

Mix flour and baking powder in a mixing bowl.  Add the cold butter and rub with fingertips until the mixture resembles fine bread crumbles.  Stir in sugar and salt. 

Break an egg into a liquid measuring cup and mix with fork, add enough milk to measure 5 ounces. (That will be just under 2/3 cup total.)

Pour egg and milk mixture into flour mixture a little at a time, mixing lightly until the dough just comes together; you may not need all of the liquid.

Gather mixture and place on a lightly floured surface, knead very gently, just until it holds it’s shape.  Flatten with palms to approximately 1/2 inch thick.

Cut into 2 inch rounds with a biscuit cutter and place on a greased baking sheet, (I use parchment.)  Lightly gather remaining dough and repeat cutting.

Brush tops with any leftover egg/milk mixture.  Bake for 10 minutes or until they are pale golden in color.  Serve immediately.

Notes:

I find the dough works better for me when it’s just a little more moist that I think it should be. I use a very gentle hand when patting it out, you don’t want to overwork the dough.  Keep the dough very cold the whole time.  If the butter starts to melt before going in the oven, the scones will flatten and spread.  If things start getting warm, place the dough in the fridge just long enough to cool things off.

dc_lcc170_lg

Clotted Cream is a beautiful thing.  If you’ve ever had fresh clotted cream from South-West England, you know what I’m talking about.  There’s nothing like it.  Unfortunately, if I want clotted cream here in the states, I have to either buy it in a jar, (above), which is kind of expensive, or make it myself. 

I’ve yet to try making it for real.  That’s something I hope to try soon.  For the party, I used a recipe found HERE.  It uses mascarpone cheese and heavy cream.  It isn’t quite like the real thing, but it worked well enough.  I would recommend it in a pinch. (Note: I did not use the optional zest.  It seemed unnecessary to me.)

07 copy

If you remember from the last post, the guests had a sweet take-home treat. 

IMG_5388 copy

These cookies are my favorite cut-out sugar cookies from Nigella Lawson.  They hold their shape when baked and are very reliable.  The trick for me is to take them out before I think they are done so they are still a little soft.

The icing is Wilton’s Royal Icing recipe.  I kept it thick to outline the cookie then thinned the rest with water and about 1/8 tsp. lemon extract and filled in the cookie.  I don’t know how many of these I had, I was a little addicted. 

IMG_5395 copy

I placed the cookies in little goodie bags, (Hobby Lobby), folded them and closed them with a little sticker.  I used Avery 3/4 inch diameter stickers stamped with a little clock face from a cool cling sticker collection from Hobby Lobby.  It kind of has this Steampunk-ish vibe going on.  I'm looking forward to using all the little stamps in the future!

Next post: How to plan an Alice party.

Wednesday, August 17, 2011

A Hoppin’ Party: The Meal


When it comes to first birthday parties, since your little one isn’t likely to have a bunch of cronies yet, it’s likely the guest list will be made up with mostly family and close friends.  By the time I added up everyone who absolutely had to be invited, it was already going to be a big guest list, so why not add a few more people who love our son?  We had invited about 60 people in the end.  We also decided that an evening party would be best for several reasons.  This worked out great because some family wouldn’t have been able to come to an earlier party.  Since we were having an evening party, we decided to serve a full meal. 

We kept the menu simple: salad, two kinds of pasta and bread.  My Mother-In-Law took care of the salad and bread.  My Sister-In-Law, Leigh, made the spaghetti sauce which I used to make Baked Spaghetti.  Basically, I just mixed the cooked spaghetti and sauce in a pan and added a few cups of shredded mozzarella to the top before covering with foil and adding to a warm oven.  I used the Hefty EZ Foil Party Pans Giant Size (19 1/2 in x 11 1/2 in).  They fit over the steam tables we used.  I was able to fit four 1 pound boxes of thin spaghetti plus sauce and cheese into the one pan. 

103_2221

The other pan held 3 batches of Chicken “Fettuccini” Alfedeaux.  This is alfredo for people who don’t like alfredo. Trust me, I live with one of these people.  My husband WILL NOT eat fettuccini alfredo, but he loves this!  I think the secret to this dish’s success is that the cream sauce is not thick and overpowering as you will usually find alfredo sauce to be. 

And if you’re wondering about the spelling of Alfredeaux, that is because the chicken is seasoned with Cajun spices.  I only seasoned the chicken so that it wouldn’t be too spicy, but it is really good with a little dash over the top of the pasta too.

103_2215

I lost count of how many requests I had for this recipe; it really is that good!  But I can’t take credit for it as I once requested this recipe from our friend Keith.  Thank you so much Keith, I am so grateful!

103_2310

Chicken “Fettuccini” Alfredeaux

6-8 servings
1-12 oz. package of wide egg noodles
1 package of Knorr White Sauce or Alfredo Sauce Mix
2-3 cloves of garlic, minced
2-3 large boneless chicken breasts
Cajun spice mix to taste
1 cup parmesan cheese
1 stick butter
1 pint heavy cream (although half and half works too)

Prepare noodles according to the package directions, drain and set aside.

Bake or grill the chicken seasoned with the Cajun spices.  Cut up or tear the chicken into small pieces.

Melt the butter in a large pot.  Add the packet of sauce mix and stir.  Add the cream.  Bring to a boil.  Reduce heat and simmer for four minutes, stirring constantly.  Remove from heat: add the cheese and garlic and mix well. 

Mix well and pour over the pasta.  Toss the pasta well until the sauce is distributed throughout.  Finally, add the chicken and stir into the pasta.

Serve warm and with a dash of Cajun spices over the top.

Click here for the Printable Recipe at Tasty Kitchen.

Linked to Suzy’s Artsy Craftsy Sitcom and Today’s Creative Blog.

Wednesday, July 27, 2011

A Sweet Collaboration

When I first started blogging, I often saw mention of how blogging brings people together and you can become friends with bloggers from all over the world. At that time, I couldn’t really grasp the thought, but now I know it is true. Blogging these past two years has not only allowed me to share some things in my life to you, but has introduced me to some fabulous people out there in the blogosphere.

One of my new friends is Tricia who writes and illustrates the blog Trillustrations. I stumbled upon Tricia’s blog almost two years ago and instantly became addicted. She has the cutest illustrations, many of which she generously shares for free on her blog. Of course, she is happy to create a custom illustration for you.

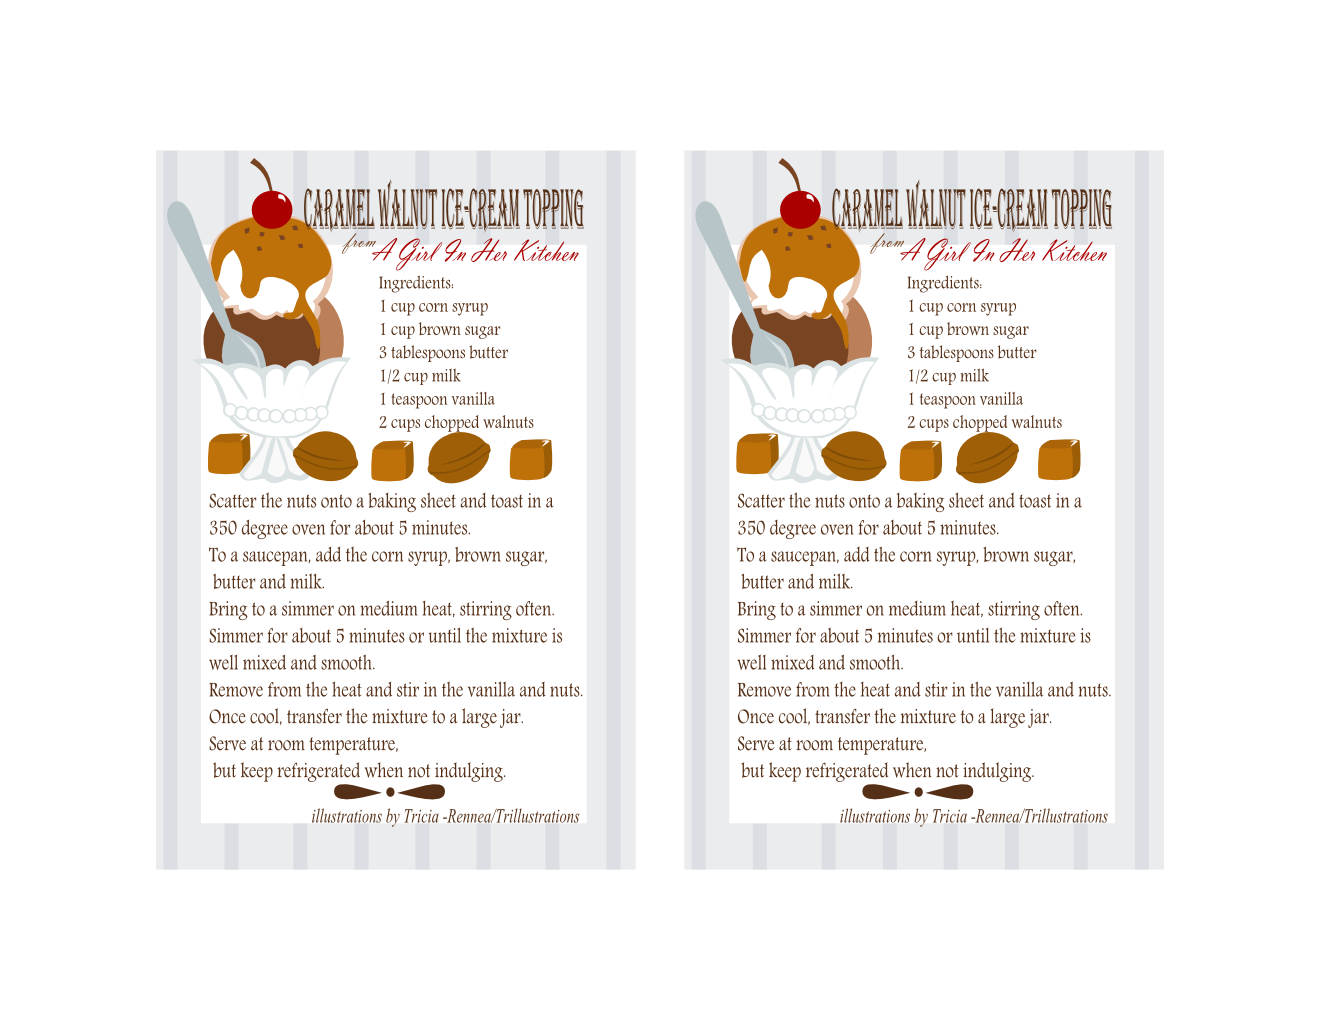
Together, we have a special treat for you. I’m sharing a delicious recipe and Tricia has created a lovely recipe card for it. First, the recipe…

Take your ice cream to the next level with this Caramel Walnut Ice Cream Topping!!


103_2159

It is sweet, crunchy and perfect with vanilla, chocolate and even coffee flavored ice cream. It’s also super easy to make, so make up two batches and share one with a friend. Tricia has made it easy to share this recipe; there are two per page!

 caramelwalnuticecreampagefixpng

Click on the picture to enlarge and print, or write to me at emcook17[at]comcast[dot]net for the pdf file.


Make sure to visit Trillustrations to see all of Tricia’s beautiful artwork. I know you’ll love her work as much as I do!

103_2148

I’m also linking this to Made It On Monday,  Polly Want A Crafter?, Today’s Creative Blog and Tasty Kitchen to share the love.

Thursday, June 9, 2011

Big Fat Cookie

What could be better than a chocolate chip cookie?  How about a chocolate chip cookie so big you have to bake it in a skillet? 

103_1957

When I saw this recipe on Tasty Kitchen, I knew I had to make it.  I just had to wait for the right opportunity where there would be plenty of people for sharing.  That’s just too many calories for one person.  So I made it for a family reunion, and there was barely a sliver left when it was done.

103_1969      

Serve this warm and gooey with some ice cream, and you’ll make lots of friends!

Note: On Tasty Kitchen, you can change the serving size and the ingredient quantities will adjust automatically.  If you want a large cookie, change the serving size to 6 and use two eggs and bake in a 10 or 12 inch skillet.  I plan to try this as a 2 serving cookie and bake in a small skillet.  There is also a link to the blog post where this cookie was originally made.

103_1958

Monday, April 11, 2011

Dressing Up Dinner: Sweet Peas

I have recently been on a quest.  A quest to find a great way to cook Sweet Peas.  You know, other than drowning them in butter.  Of course a little butter is ok. So, one day, I put a few things together and came up with a recipe for peas that I think I could eat all the time. 

103_1737

Dressed Up Sweet Peas
Serves 4
1-2 tablespoons butter
1  (15 oz.) can of Sweet Peas
1/2 cup chicken broth
Scant 1/2 teaspoon dried sage

In a small saucepan, melt butter on medium heat.  Add drained peas, chicken broth and sage to pan, stir and bring to a boil.  Reduce heat to low and simmer, stirring often,  for 10-15 minutes or until the liquid is mostly evaporated. 

Click here for the Printable Recipe at Tasty Kitchen.

Linked to Made It On Monday.

Thursday, April 7, 2011

Tinker Bell Birthday Party


Cupcake

This weekend we celebrated Sophie’s 3rd birthday.  It became obvious to me a few months ago that Sophie’s obsession with Tinker Bell would provide the perfect theme for this party.  Our colors were Lime and Lavender to match just about every Tinker Bell item Sophie owns.   It was so much fun to plan!

We had the challenge of turning our church fellowship room into “Pixie Hollow”.  First let me show you “the backdrop”.  I had originally dreamt up something different, but it wasn’t going to work out.  My sister-in-law, Leigh, whipped this backdrop up the morning of the party to give a nice scene for opening presents.  Those are “fairy lights” aka white Christmas lights leftover from our wedding (they are used elsewhere too), a blue sheet and purple and green tulle tied with ribbon.  Leigh used thumbtacks to hold everything up.  This turned out so much nicer than what I had planned.

backdrop

Hanging above is a “wreath-a-lier” that I made.  It is a Styrofoam wreath form (14”) with crepe paper roses hot glued all over and hung with ivory ribbon.  Don’t ask me how many roses! This was definitely a labor of love.  I wish you could all see it in person as these pictures do not do it justice.  Good news is that I can use it to decorate for spring, so we will get a lot of miles out of this thing.

wreathalier

To use as table centerpieces, I bought six of these little $1 birdhouses from Jo-Ann’s Fabric.  Then I painted them brown and hot glued green Spanish Moss, also from Jo-Ann’s, to the roofs.  On three of them I made “Fairies Welcome” signs made from stuff from my yard.  The other three I left blank.  And that’s scrapbook paper they are sitting on. Now that the party is over, I’m using the scrapbook paper to make a mini Birthday Party scrapbook using a small photo album. The kids got to take the birdhouses home along with their goodie bags.  The girls got the ones with signs and the boys got the plain ones to be “bug houses.”  I meant to stick some flowers in the moss, but left them at home.  Oh, well.

cirlce bh

Speaking of goodie bags, here they are.  They are just brown lunch sacks that have Tinker Bell and friends printed on the front.  I can’t remember where these were bought, but I’ve seen them all over.  Behind them are more fairy lights with flowers attached. These were made by dying white coffee filters in water and food coloring.  After drying, I stacked four filters of the same color and pinched them in the middle and tied a twist tie around the pinch.  Then I fluffed the flowers and attached them to the lights with their twist ties.  It’s super easy!

flowers

The kids made necklaces with “Fairy Treasure”. 

103_1638_thumb[2]

The food table was a challenge. As you can see there is a plain brick wall behind the table.  Leigh and I hung streamers and white paper lanterns over the table.  More fairy lights grace the table behind the food.  Aside from the food I’m about to mention, we also had a fruit and veggie tray, dip and chips, and Starburst Jelly beans, which just happen to be the best jelly beans to be found on this Earth, just sayin’.

food

We served lemonade out of this cute dispenser bought for 6 bucks at Walmart.  It has a lovely pattern on it too, which worked well with the theme.  Behind it are the napkins I fanned into a wing pattern, don’t know if anyone noticed but it thought I was clever.  Punch cups for the adults and Tinker Bell cups and straws for the kids.  Leftover lanterns rest in a wire basket.

lemonade

Our choice of cookies were Oreos, to cater to a child with nut and egg allergies, and these cute flower shaped sugar cookies made using Nigella’s recipe and Wilton’s Royal Icing in Lavender to match our theme.

Cookie

I wanted to serve Tinker Bell inspired cupcakes, so I sketched a few ideas and settled on these two.  In the yellow baking cups (both ruffled baking cups made by Wilton) are Yellow Cake (from a box because I haven’t found my perfect yellow cake recipe yet).  The purple cups hold the most amazing chocolate cake ever (from Pioneer Woman).  Both are toped with That’s The Best Frosting I’ve Ever Had.  The chocolate cupcakes are iced to look like grass with purple wildflowers.  The yellow cupcakes just scream ‘Tink’ to me.  On top of the green swirl rests a pearlescent gumball from Party City.  It’s pretty and tastes good too!

Cupcakes 1

I brought Sophie’s Tinker Bell costume which she had to wear for singing to her, blowing out the candles and opening presents. 

sophie and candles

We’re blessed to have a playground at the church building, so the kids got to play.  I think they had a good time.

playground

Sophie had a great birthday party, she’s still talking about it.  Now we just have to sit back and wait for a fairy to take up residence in our little fairy house. “Come on Tink, we’ll even share our jelly beans!”

Linked to Made It On Monday, Bear Rabbit Bear and Muffin Monday.

Thursday, March 31, 2011

Dessert Wars: Go Green

Dessert Wars


March’s Dessert Wars challenge is Go Green. To celebrate St. Patty’s Day and the color green, the challenge is to create a dessert using naturally green ingredients. We must use at least one traditional dessert ingredient and at least one non-traditional ingredient.

Traditional Non-Traditonal
Green Apples Cucumber
Green Grapes Green Tea
Limes Wasabi
Pistachios Green Chilies
Honeydew
Kiwi
Basil or other green herbs
Green Pears Soybeans/Tofu
Mint
Pandan
Vegetables like Spinach or Peas
Lemon Grass
Green Cheese
Avocado


My inspiration came to me in a funny way. I wasn’t sure what I was going to do for this challenge. Then one day I was adding wax to my Scentsy warmer. It smelled so good, and I realized that the scent was Cucumber Lime. Perfect! Now what to make with that? I settled on a granita, something I’ve never made before, but it’s so easy I don’t know why I haven’t yet.

Granita is a Sicilian dessert with many variations. It can either be coarse and crystalline or smooth and slushy. The technique I’m giving provides the coarse texture.


103_1592


Cucumber Lime Granita

Serves 4

Ingredients:

  • 1/2 cup sugar
  • 1/2 cup water
  • pinch of salt
  • zest of two limes, divided
  • 3 tablespoons lime juice (about 2 limes)
  • 2 cucumbers

Directions:

In a small saucepan, add the sugar and water. Swirl the pan to mix. Then bring to a boil on medium-high heat. Reduce to medium-low and simmer for 2 minutes to make a thin syrup. Take the pan off the heat and allow to cool to room temperature.

Now is a good time to zest and juice your limes. Then, using a peeler, peel the cucumber, cut off the ends and slice the cucumber in half lengthwise. Scoop out the seeds using a melon baller or a spoon. Chop the cucumber into smallish cubes until you have 2 cups.

Add to a blender the cucumber, lime juice, half the zest, salt, and 1/3 cup of syrup. Puree until it is nice and smooth. Pour into a shallow dish, cover and stick it in the freezer for 2 1/2 hours.

Remove the dish from the freezer, uncover and rake a fork through the mixture. Recover and return to the freezer for another 1-2 hours. Repeat the raking/freezing process every 1-2 hours until you are left with nothing but tiny ice crystals.

Serve in chilled glass vessels of your choice. Garnish with the remaining lime zest.

Pioneer Woman has a great step-by-step for making granitas. Check it out!


Click here for the Printable Recipe at Tasty Kitchen.


As February’s Dessert Wars Winner, I’m not currently eligible to win any more challenges until December. But I can’t leave you without showing you what this month’s winner will receive.


The March prize package includes:

Whisk and cupcake necklace from Moon & Star Designs

Beanilla Sampler Pack of Vanilla Beans

Lenox Personalized Musical Cupcake

1,000 ideas for Decorating Cupcakes, Cookies & Cakes

Organic Valley $50 Gift Certificate

Organic Prairie $50 Gift Certificate

Theme Kitchen $50 Gift Certificate

BEKA Cookware Crepe Pan


Click here to see the Dessert Wars rules


Lark's Country Heart

Monday, March 7, 2011

Just Peachy

Here’s another recipe from Nana. Peach Cobbler is one of my favorites, not only because it tastes so good, but because it is simple to make. It would be great as an impromptu dessert, to take to a potluck, or give away to a lucky friend. (A cute little loaf pan such as in the photos can be found many places. Mine came from Michael’s a few years ago, but I’ve seen them all over. They are perfect for gift giving.)

pc1

Yummy with vanilla ice cream!

Nana’s Peach Cobbler

3/4 stick margarine 1 teaspoon cinnamon
1 cup milk 1 (29 oz.) can sliced
1 cup self-rising flour peaches with syrup
1 cup sugar

Place margarine in a 9x13 casserole dish and melt in oven at 350 degrees, (I do this while the oven is preheating). Mix milk, flour, sugar and cinnamon together. Pour mixture into the dish with the melted butter. Evenly arrange the peach slices on top of the batter. Pour the syrup from the can over the entire pan. Do not stir! Bake for 30 minutes.

pc2

It’s divine with a little cream poured over!

Click here for the Printable Recipe at Tasty Kitchen!

Monday, February 21, 2011

Milk and Cookies and Milk

103_1380

Here’s a recipe I found on Tasty Kitchen that I wanted to share with you. It’s for Lactation Cookies. These cookies include ingredients said to increase the nursing mom’s milk supply.

Peaceful Parenting has a nice post telling you about the benefits of oatmeal, flax and yeast in increasing milk supply. Check it out here.

I thought these were some pretty yummy cookies. I diverged from the original recipe by using margarine instead of butter, adding more chocolate chips and because I didn’t have fresh yeast I used 1 1/2 tablespoons dried yeast. I also think that because of the effect the flax has on the finished cookie, these are best on the crispy side. I left them in the oven a little longer to do this, and probably the margarine helped them spread well too. You can store these in a plastic freezer bag. Take one out of the freezer and microwave about 10 seconds before enjoying. Eat at least 1 a day for the milk increasing benefits.

Here’s where you can find the recipe. Of course, if you’re concerned about your milk supply, finding a good Lactation Consultant and/or a breastfeeding support group will be very important. A Lactation Consultant will make sure your baby is getting a proper latch, getting enough milk, and can help with other nursing troubles too.

StarIf you have other family members jealous of your special cookies, by all means share! You don’t have to worry about your husband or children spontaneously lactating. They can benefit from these healthful ingredients too!

103_1381

Tuesday, February 15, 2011

Dessert Wars: Dark Chocolate and Hearts

Dessert Wars: February's Theme

Dark Chocolate and Hearts is this month’s challenge for Dessert Wars. Dark Chocolate is quite possibly my favorite food. So it broke my heart when during my pregnancy with Sophie I had a food aversion to chocolate. I couldn’t believe it! I couldn’t get enough of pinto beans of all things, but chocolate? No thank you! Weird huh?

I can think of several really easy ways to use dark chocolate and hearts, but since the reason to compete in Dessert Wars is to “step outside your comfort zone, push yourself in the kitchen to learn new skills and get your creative juices flowing,” I decided to attempt something I have on my Foodie To Do List. That is to work with laminated dough. Even if you don’t know what laminated dough is, you’re certainly familiar with it if you’ve ever had a croissant, Danish or anything made with puff pastry.

Lamination is achieved by spreading butter over rolled out dough, folding and rolling out again. This rolling and folding process is repeated until the dough has many layers. The butter in between these layers of dough create the flakiness and lift in the baked dough. And it sure makes it yummy too! There’s only one way to make it any better, that’s right, add chocolate…and hearts! I’m making Pain au Chocolat, you can join me every step of the way or just scroll down and see the pictures.

By the way, I love the name Pain au Chocolat. French names sound so fancy, but translated it just means chocolate bread. I think I’ll start naming everything in French. How do you say peanut butter and jelly sandwich in French?

Pain au Chocolat

Makes 20-24

Click here for the Printable Recipe at Tasty Kitchen

Détrempe (Dough Mixture) Ingredients
1/2 cup warm whole milk (110-115 degrees)
1 teaspoon plus 2 tablespoons sugar
4 teaspoons active dry yeast or 1 tablespoon instant yeast
4 cups all-purpose flour
2 teaspoons salt
1/2 stick cold unsalted butter, cut into small pieces
1 cup cold whole milk
Beurrage (Butter Mixture) Ingredients
3 1/2 sticks cold unsalted butter, cut into 1/2 in. pieces
2 tablespoons all-purpose flour
Other Ingredients
1 large egg
1 tablespoon whole milk
1-2 cups dark chocolate, chopped
or 24-48
chocolat batons for filling the rolls
Writing Chocolate, optional (click for recipe)

Step 1 Make the détrempe: Whisk together the warm milk and 1 teaspoon of sugar. Mix in the yeast and leave until the yeast is activated, around 10 minutes. You’ll know it’s ready when it starts to bubble and grow. In a large bowl add the flour, 2 tablespoons sugar, salt and butter. Cut the butter into the dry ingredients using forks or a pastry blender until the mixture looks like bread crumbs. Add the yeast and cup of milk and stir together with a wooden spoon until the dough forms a ball. Lightly flour your counter and knead the dough until it comes together a little bit more. Don’t knead too much because there will be a lot of rolling and folding done to the dough later. Wrap the dough in plastic cling, but not too tight since there is yeast in the dough it will expand. Refrigerate for at least a half hour or up to an hour.

Step 2 Make the Beurrage: Toss the butter with the flour and stick back in the fridge for 20 minutes. Using a mixer, beat the butter with a medium speed until all the butter is smooth and pliable. It must stay cold too! Wrap the butter in plastic cling and refrigerate until needed.

Step 3 Incorporating the Beurrage with the Détrempe: Lightly flour the counter. Place dough on the counter and lightly dust the top. Roll the dough into a tall rectangle measuring 15x12 inches. Try to make the edges straight and the corners sharp. You can gently stretch the dough to achieve this. Brush off the extra flour. (Extra flour will make for a very dry, tough dough so remember this throughout the whole process.) With your eyes, divide the dough into thirds as if each third was a section of a folded letter. Using your fingers, spread the butter over the top two thirds of the dough, leaving a half inch border around the outside of the dough.

103_1389

Step 4 Using the Letter Fold: Fold the bottom third of dough over the middle third of dough as if you were folding a letter. The empty bottom third of dough will be resting over the butter of the middle third. Finish the letter fold by folding the top third down. Very lightly pinch the seams together and carefully roll your rolling pin over the dough to seal the seams. As long as your butter is still cold, you may proceed with the next step. If not, wrap the dough in plastic cling and return to the refrigerator for an hour.

Step 5 Using the Book Fold: Lightly flour the counter. Place dough on the counter and lightly dust the top. Roll the dough into a tall rectangle measuring 20x12 inches. Dust off extra flour. Fold the two short sides of the dough into the middle leaving a space of 1/4 inch between the two. Then fold both sides together like folding a book. Roll the dough gently to seal the seams. Wrap and refrigerate for 1 hour.

Step 6 Another Letter Fold: Lightly flour the counter. Place dough on the counter and lightly dust the top. Roll the dough into a tall rectangle measuring 20x12 inches. Dust off extra flour. Fold the dough using the letter fold. Gently roll to seal edges. Wrap and refrigerate for at least 2 hours but no longer than 24 hours. You could freeze for up to a month instead.

*This is a really good place to stop for the day. That’s what I did.

Step 7 Cutting and Shaping the Dough: Flour your counter then roll out the dough to a rectangle that is 1/4 inch thick, about 26x14 inches. With a sharp knife or pizza cutter, cut the dough in to 3 1/2 in. x 4 1/2 in. rectangles. For each rectangle, do the following: visually divide the rectangle into thirds as you did with the letter fold before. Place a half tablespoon of chocolate on the top third and fold the top third over the chocolate to the middle. Place another half tablespoon of chocolate where the top third meets the middle and fold the bottom third over the chocolate. Turn the roll over so that the seam is on the bottom.

*The rolls can be frozen at this point. Just cover tightly with plastic cling and freeze for up to a week. Thaw overnight in the refrigerator before moving on to step 8.

Step 8 Egg Wash and Proof: In a small bowl, beat the egg and then add the tablespoon of milk. Brush each roll with the egg wash. Save the egg wash in the fridge. Set the rolls in a cool spot in your kitchen to double in size for 1-2 hours. Don’t let them get warm!

Step 9 Baking: Move your oven rack to the center of the oven and preheat to 400 degrees. Put the rolls in the refrigerator until the oven is preheated, at least 15 minutes. (You could leave them in the freezer for 10.) Brush again with the egg wash. Bake for 17-22 minutes turning the pan halfway through. You know their done when they are a rich golden brown. Allow the rolls to the rest on a cooling rack before devouring. Drizzle with writing chocolate or pipe decorations.

103_1434

*Baked rolls will only last one day, but you must keep them unwrapped. To keep longer, wrap each pain well with plastic then put them all together in a large freezer bag. They can hibernate in your freezer for up to a month! Then just thaw them for about 30 minutes then bake them for 7-8 minutes in a 350 degree oven.

Now I know there’s a lot to do here, but nothing is very difficult. I think the hardest thing for me was rolling out the cold dough. As far as it being time consuming, yeah, it takes a lot of time, but most of that is spent in the fridge. Trust me, if I can find the time to do this with a infant and a toddler, then with a little planning probably anyone can. Just make sure you read the instructions really well before you start.

I definitely recommend finding the chocolat batons to use. They should make things easier. I couldn’t find the chocolate that I really wanted to use, so I just used semisweet chocolate chips. Instead of keeping them whole and lining them up on the dough, I tried to chop them in my food processor and it chopped them too fine. It was a mess. So keep that in mind. But I will definitely order some batons for next time. Nevertheless, these were amazing! I will make these again many times.

103_1438

GREAT NEWS!!! I won this round. Check this post for more info.

Congratulations to January’s Dessert Warrior

Heather of Girlichef who made

Fried Nutella Ravioli.

Congrats also to January's Runner Up

Xiaolu of 6 Bittersweets

who made

j11ru

Chocolate Nutella Alfajores

Click here to see the January Round-Up.

The February prize package includes:

Whisk and cupcake necklace from Moon & Star Designs

The Smartshopper Electronic Grocery List Organizer

Beanilla Sampler Pack of Vanilla Beans

Lenox Personalized Musical Cupcake

1,000 ideas for Decorating Cupcakes, Cookies & Cakes

Endless Vanilla and Cinnamon Extract

Unlimited Layers: A Recipe for Turning Your Passion into Profits

Organic Valley $50 Gift Certificate

Organic Prairie $50 Gift Certificate

Theme Kitchen $50 Gift Certificate

BEKA Cookware Crepe Pan

Click here to see the Dessert Wars rules.