Showing posts with label Elizabeth's Recipes. Show all posts

Friday, June 28, 2013

Classic French: Fruit Tarts


This month’s Classic French challenge was Fruit Tarts.  I keep forgetting that I do not own a normal sized tart pan, but I do have four small individual sized tart pans.  I had never used them until the other day.  Yes, this is my 3rd CF challenge, and my 3rd first time making said challenge dish. 

Trying to decide what tart to make took a while.  I searched my cookbooks for the best recipes, and settled on a pâte sucrée, (short crust pastry), blind baked, and filled with crème patissière, (pastry cream) and topped with fresh peaches. 

IMG_8637

This is peach time in my neck of the woods.  I love a good peach.  Early in my pregnancy with my son, I craved a good peach. The kind that you can taste the sun in it.  You know what I’m talking about.  I wanted a peach I could bite into and the juice would drip down my chin.  Soft and sweet, with just a hint of tang.  But it was January.  I could have cried.  The really sad part is that when summer finally rolled around, I was not interested in peaches anymore.  BUT right now I can get those delicious peaches at our neighborhood produce stand.  Linda’s Produce is the best place in our area to get produce.  I just walk in and pick out which fruits and vegetables look good to me and then plan meals and snacks around them.  It’s a good plan.  

IMG_8634

Peach Tart

This recipe will make 4 small tarts or one large one.  Buy enough peaches to spread over the tart, about 1 per person, but make sure you have more, just because. 

Pâte Sucrée
1 1/4 cups all-purpose flour
1/4 cup sugar, (I used vanilla sugar)
1/4 teaspoon salt (I prefer fine sea salt)
1 stick cold unsalted butter, cubed
2 egg yolks
2 teaspoons vanilla extract
1-3 teaspoons water

Pulse flour, sugar and salt in a food processor.  Add the butter and pulse until the butter crumbles look like peas.  In a small bowl, whisk together the egg yolks, vanilla and 1 teaspoon of water. Add the egg mixture to the food processor and pulse until is starts to clump.  It should not be crumbly, add a little more water until it is nice and smooth and not crumbly.

Press the dough into the tart pan.  Try to keep the dough even and pretty. It’s all about the details from here on out.  Stick the pan(s) in the fridge for an hour or the freezer for 30 minutes. 

Preheat the oven to 375 degrees.  Blind bake by covering the crust with foil and lightly pressing it down. Fill the crust with dried beans or rice that you don’t plan on eating at this point, (keep them around for more blind baking later.) Bake for 20 to 22 minutes.  Peel back the foil, if it doesn’t come off easily, bake for another 5 minutes and try again. Take the foil and beans off and bake the crust for another 10 minutes until golden.  Allow to cool outside of pan on a rack.  Once cool, return to pan to be filled. 

Crème Patissière
2 cups whole milk
1 teaspoon vanilla extract
6 egg yolks
1/2 cup sugar (vanilla sugar again!)
3 tablespoons all-purpose flour

In a saucepan, heat the milk to just below a boil.  In another bowl, whisk the egg yolks and sugar for a couple minutes until it is lighter in color.  Add the flour and whisk.

Add the milk to the egg mixture, whisking quickly.  Keep whisking until all is smooth. 

Pour the mixture back into the saucepan and heat to a boil, whisking the whole time.  If a lump appears, remove from heat and whisk until smooth.  Continue cooking and whisking until flour is cooked (a couple minutes), and everything is smooth. Remove from heat and whisk in extract.  Cover with cling wrap, pressing to the surface of the cream to keep a skin from forming. Refrigerate until completely cool and ready to use.

Filling the tart
1/8 cup apricot jam
teaspoon of water (or so)
Peaches

Blanch the peaches in boiling water for 10-30 seconds.  Remove to cold water bath.  Peel the peaches starting at the stem end and working down.  Thinly slice the peaches and set aside.

In a small heat proof bowl, mix the jam and water together.  Heat for 30 second in the microwave then stir until smooth, add more water or heat for longer if needed. You want a smooth but not runny glaze. Brush the inside of the crusts with the glaze to protect it from getting soggy.

Fill the crust to almost the top with the cream.  Leave room for the fruit! Arrange peach slices in a pattern to cover as much cream as possible.  Brush the tops of the peaches with the remaining glaze to make them glisten.  You can place the tart pan on top of a tin can.  Carefully pull the sides of the pan down to leave the tart hovering above.  Remove the bottom of the tart pan if you are brave, or just serve the tart as is. 

The tarts can be refrigerated for a short time, but plan on eating them the day they are made.  Cream and crusts can be made ahead of time for stress free entertaining.  Always hold the tart pan from the sides and not the bottom, you don’t want to destroy the tart!

I’m also linking this to Simple And In Season.  I’ve just learned of this and look forward to getting new ideas for eating what is in season!

Simple and in Season

Monday, May 27, 2013

Classic French: Macarons


Earl Grey Macarons

We had been wanting to go on a picnic recently, but the weather was not cooperating.  Finally, Brian had a day off that also promised nice weather. We jumped at the chance!

IMG_8502h copy

As I’ve said before, picnics should be relaxing and fun, so keep it simple.*  I did want to make it a pretty picnic, so I went with a blue/white theme.  It was as easy as going through my linen closet and kitchen cabinets.  I have a lot of blue and white things, so this was no problem to put together.  I have to say it was genius of me to think of the coasters, they gave our cups a level-ish place to stand.  My 2 year old had absolutely no trouble keeping his cup upright this way. 

Since I knew that we were having our Classic French Macarons for dessert at this picnic, we decided to have something of a French picnic with a baguette, a selection of cheeses, deli ham and some gorgeous purple grapes, with lemonade to drink. Aside from the pre-chilled lemonade and macarons, everything else was picked up at the grocery store on the way to the park. Super easy prep!

IMG_8509h copy

Sophie enjoying her bread.

IMG_8519h copy

Daddy dressed Liam as a pirate, in hopes he would keep something on his head.  Great idea Dad!

IMG_8503h copy

Our Earl Grey Macarons!  I packed them in a small metal loaf pan and kept them chilled with the lemonade during transportation.  I didn’t have to worry too much about melting because the filling is ganache, much more stable than buttercream in the heat.

IMG_8520h copy

Liam kept reaching for these; he knows a good thing when he tastes it.

IMG_8527h copy

Delicious!

IMG_8521h

Unplugging from the world and just spending time together as a family in nature is good for you.

IMG_8532h copy

It brings calm and happiness.

IMG_8530h copy

It makes memories.


IMG_8514h copy


So, in keeping with my Classic French experience so far; here is my first time eating and making macarons.  I think, for my first time, they turned out pretty well.  I know they are not perfect, but they could be worse!  Anyway, they tasted fantastic, and that’s what they are for!

I followed the recipe and advice from Stella Parks of bravetart.com.  She is a macaron master, and I learned so much from her posts about macarons.  You can find her basic recipe HERE!  I adapted her recipe by adding the contents of 3 Twining’s Earl Grey tea bags (1 Tablespoon of dry tea) to the dry ingredients.  Earl Grey has such a lovely fragrance!  For the filling, I made an Earl Grey infused chocolate ganache.  This ganache is crazy good!  It was actually the basis for this whole Earl Grey macaron concept.  I first encountered Earl Grey truffles at Claude’s Chocolates in St. Augustine, Florida.  And they are amazing!  I don’t know why it has taken me so long to try this. 

Earl Grey Ganache

Ingredients:

8 ounces good quality milk chocolate chips

3/4 cup heavy whipping cream

2 tablespoons unsalted butter (optional for normal truffles, but good for a smooth filling.)

1 Earl Grey Tea bag or 1 teaspoon of loose Earl Grey in a diffuser

Directions:

Place the chocolate chips in a heatproof bowl.  Place the cream, butter and tea in a small saucepan.  Heat on medium low to allow the cream to slowly warm and the tea to infuse it.  Allow the tea to steep for about 5 minutes after the cream is good and warm (you should gently stir it often), then turn up the heat to medium and bring the cream just barely to a boil. Remove the tea and pour the cream over the chocolate.  Stir the mixture until it is smooth and shiny.  Allow it to cool to room temperature before piping into the macarons.

A note on macarons.  Stella Parks mentions that macarons get better with age.  You just stash them in the fridge.  I have to tell you that when I first made these, I had one to test the flavor.  They were too sweet!  Not the ganache, but the shells.  So sweet I didn’t think they were very good.  But I put them in the fridge and left them for 5 days until we could have our picnic.  Something magical happened during 5 days of refrigeration.  The sweetness mellowed somehow.  They are still sweet, of course, but just right.  And the Earl Grey really shines.  So, please, send your macarons on refrigerated vacation.  It’s the right thing to do.

*My philosophy of picnics is that they should be relaxing and stress-free.  Too much work will not allow that, so that’s why I keep things simple.  If you, however, can pay someone to do all the work for you, then you can throw an elaborate picnic like the olden days. BBC Food has an excellent article on picnics, and how you can enjoy a traditional picnic.  But, no matter how you picnic, make sure it is enjoyable, and spend time with people you love. 

Thanks to Jen at Blue Kitchen Bakes for giving us the Classic French Challenge and Victoria at A Kick At The Pantry Door for hosting this month.

Thursday, June 28, 2012

Forever Nigella: Afternoon Tea


FN_Banner_AfternoonTea_16

Forever Nigella #16 is being hosted by Fleur of Homemade By Fleur. This month’s challenge is to prepare and blog any Nigella Lawson recipe for Afternoon Tea. Forever Nigella is organized by Sarah at Maison Cupcake.

Afternoon Tea.  For us Americans, we think of it as something we have to get dressed up for and try our best to be posh.  But in reality, Afternoon Tea is supposed to be a snack to get us through the afternoon to dinner.  Now, I could go into all the different kinds of “Teas” there are, but I’ll save that for another post.  Today, lets treat Tea as so many do, with a cup of tea and a nice cake, cookie, or other sweet treat. 

I’m usually a chocolate lover, but in the summer, I’m a sucker for Lemon.  When I saw these Little Lemon Puddings on Nigella.com, I was hooked. (Translation: pudding can mean a steamed cake or just dessert.)  These puddings, are what Nigella calls a “short-cut version of the traditional English Canary Pudding.”  The traditional is steamed, while these are baked.

main

Don’t they look sunny and happy?  And Cute! And just look at that drippy lemon curd!  I gave these a try for a family dinner.  They were a big hit!

I had to use a conversion chart to figure out a few things:

125 grams of sugar = 1/2 cup + 1 Tablespoon

125 grams of butter = 1/2 cup + 1 Tablespoon

125 grams of flour = 1 1/8 cup

Preheat oven to 350 degrees F, (the equivalent to the 180 degrees C and gas mark 4).

I also used silicone cupcake liners, so they were a little smaller than the ramekins I would have used, so I got 8 servings instead of just 6.

IMG_5683

Mine didn’t turn out as golden as the Nigella photo, but that doesn’t keep them from tasting delightfully lemony.  The lemon curd on top is the icing on the cake, literally. 

These little puddings are a nice addition to your own Tea Time recipes.  But I didn’t stop there.  Because this little beauty is also a part of my 2012 Ice Cream Cupcake Contest entry.

ice-cream-contest-art-2012

The Ice Cream Contest is being hosted by Scoopalicious and Cupcake Project.

When I was trying to decide what I wanted to do for the contest, I thought about all the different ice creams I wanted to try making.  My mind kept coming back to Afternoon Tea.  I love lemon curd on a scone with clotted cream.  It’s divine!  So what better to go with the Little Lemon Puddings than Clotted Cream Ice Cream.  Yes, I went there!

IMG_5675

Wow! This ice cream was so good!  It’s yummy perched upon a Little Lemon Pudding, topped with more lemon curd; it tastes like sunshine!  It’s perfect for a summer afternoon.

Clotted Cream Ice Cream

6 Egg Yolks
1 Whole Egg
1/2 cup Sugar (I used Vanilla Sugar)
2 1/2 cups Whole Milk
1 Vanilla Bean (split, with seeds removed) or 1 Teaspoon Vanilla Extract
1 1/4 Cups Heavy Cream
6 ounces Clotted Cream

Use a whisk to combine the yolks, egg and sugar.  Whisk until the mixture turns pale yellow.  Add the milk and vanilla, (pod and seeds) to a saucepan and simmer.  Once it simmers, pull out the vanilla pod and VERY slowly pour the milk into the eggs while quickly whisking. 

Bring the mixture back to the pan with the vanilla pod and simmer, stir constantly, until thickened.  (It will coat the back of a wooden spoon.)

Strain the custard mixture to remove any lumpy eggs and vanilla pod.  Stash the mixture in the fridge until cold. 

Stir the clotted cream into the cold mixture. Whisk the heavy cream in a cold metal bowl until it forms soft peaks, and fold into the mixture.  Freeze according to your ice cream freezer’s manufacturers instructions.
 

*Note:  Clotted Cream can be purchased at grocery stores that specialize in international foods.  A tea room shop is another place to look.  Or you can buy online from companies like the English Tea Store.  Alternatively, you can make your own; a feat I would like to tackle soon.

2012 Ice Cream Cupcake Contest

Official Rules:

  • Dates: You can enter any time through June 30, 2012.
  • How to Enter:
  1. Create a recipe for ice cream cupcakes! The ice cream cupcakes must contain cake and ice cream (or frozen yogurt, gelato, or something ice cream-like). Cupcakes baked in ice cream cones without a frozen element are not eligible.
  2. Write a new post on your blog about your creation. The post must include a photo, a recipe, and a link to both this post and to Scoopalicious. If you don't have a blog, upload a photo of your creation to Facebook or any photo sharing site (like Flickr). Make sure that you make the photo public (on Facebook, you'll simply change "share with Friends" to "share with Public"). In the photo description, include the details about the cupcake and the recipe.
  3. Find and click the "Add your Link" button at the bottom of this post.
  4. Complete the entry form. In the name field, enter the name of your creation. In the URL field, enter the link to your post (not your whole blog). If you don't have a blog, enter the link to your photo's page. On Facebook, this is the address of the photo post, not the one that is facebook.com/yourname. When you click to add a thumbnail image, the program should let you choose from the images on your page. If it doesn't work properly, check your link. If it still isn't working, you can upload an image directly from your computer.
  5. After you submit your entry, wait a few minutes and refresh this page. You should see a thumbnail version of your entry displayed. Your entry is now complete!
  • Number of Entries per Person: Sorry, we are allowing just one entry per person this year - so make it count!
  • Judging Criteria: Cupcakes will be judged on perceived deliciousness, creativity, and presentation - in that order of importance.
  • Prizes: The Grand Prize winner and the entry prize winners will be announced by the end of July! For the Grand Prize of a $250 gift certificate to a favorite cooking store, the store (virtual or brick and mortar) must specialize in cooking and/or baking supplies. General stores like Amazon, Target, etc. are not eligible. The cooking store must sell gift certificates. Stores outside of the U.S. are eligible, but the gift certificate will have a value of $250 U.S.


Read more: http://www.cupcakeproject.com/2012/05/2012-ice-cream-cupcake-contest.html#ixzz1z9kZpUBD


Forever Nigella Rules

1. Blog your entry by 28th of the month showing:
a) the current Forever Nigella badge
b) a link to this announcement post
c) a link to the Forever Nigella page at Maison Cupcake:
http://blog.maisoncupcake.com/forever-nigella

n.b. posts must have been published since the announcement post. Archived posts need to be re-published afresh if you wish to submit.

2. Remember copyright.
You must NOT reproduce Nigella’s recipes verbatim. Tell us which book it is from and/or link to it online. If you’ve adapted the recipe in some way i.e. changed at least two ingredients or amended the method then it’s ok to publish the a recipe in your post but you MUST write directions in your own words.

3. Submit your post
Use the linky tool or email the host cc’ed to sarah AT maisoncupcake DOT com.

Friday, December 30, 2011

A Christmas Feast


Before the year ends, I thought I would share our Christmas feast with you. 

IMG_0527

We have Christmas Eve dinner at our house with my husband’s family.  The above picture shows the turkey and gravy, rolls, cranberry salad, mashed potatoes, dressing, green beans, ham, Nuts ‘N’ Bolts and Holiday M&Ms. 

AHH! I forgot to take a picture of the cranberry salad.  It’s really pretty.  It’s basically Paula Deen’s recipe with a Nana twist.  Here is Paula’s recipe.  Nana adds a larger can of crushed pineapple.  It’s probably about 15 oz. or so.  I don’t know if doing it this way will work in a mold, but it looks lovely in a crystal dish. 

I couldn’t get a good picture of my turkey, but it looked almost as good as Nigella’s from her book Nigella Christmas.

main

IMG_0520

My husband’s family is more of a ham family, but this turkey went over extremely well.  I used Nigella Lawson’s recipe for Super Juicy and Spiced Turkey.  I don’t think I will ever use another recipe.  Brining the turkey really does make all the difference.  The turkey was sooo moist and flavorful.  It got rave reviews from my Father-In-Law, who doesn’t really like turkey.  So thank you Nigella. 

I also made Nigella’s All Spice Gravy.  I actually boiled a turkey neck.  It looked so disgusting, but smelled heavenly.  The gravy was good, but I think it was barely used because the turkey was so moist, the dressing was so flavorful and the potatoes were so buttery.  Oh, well, there’s always leftovers to drown in gravy.

IMG_0524

Pioneer Woman’s Mashed Potatoes were also a hit.  “These mashed potatoes are so creamy.”  So good!      


IMG_0523

This recipe for dressing is made in the crock-pot.  I finished mine off in the microwave just to get rid of some of the moisture that was left.  Don’t worry, it was still incredibly moist.  I think I could eat this all year long.  I think I may just do that. 

Crock-Pot Dressing

3-4 cups shredded turkey or chicken (optional)
2 cans cream of chicken soup
2 quarts corn bread, crumbled
2 tablespoons dried sage
1 medium onion, finely chopped
2 hard boiled eggs, chopped
1/2 cup melted margarine
3-4 cups turkey or chicken broth
1 teaspoon salt

Mix all the ingredients in the bowl of a 6 quart crock-pot.  Cover and cook on low for 3 hours.

We also had a nice display of sweets.  No pictures though, sorry.  It’s really hard to take pictures when everyone, including the photographer/cook is starving.  But here’s what we had: Nigella’s Quadruple Chocolate Loaf Cake, Banana Pudding, Pumpkin Pie, fruit cake, and Mocha Punch.

Mocha Punch is a Christmas necessity.  It is requested every year.  Bring this out for your next special occasion and you will be praised.  Again, no pictures of it, but imagine a slightly melted milk shake.  You’ll love it!

Thanks to Nigella’s fantastic turkey recipe, I’m taking part in this month’s Forever Nigella, Christmas Presence, hosted this month by Sarah of Maison Cupcake. 

ForeverNigella_Banner_10

A reminder of the rules:

Forever Nigella #10 ”Christmas Presence”

Challenge: To prepare and blog any Nigella recipe during the Christmas period. Ideally it will be Christmassy but I’m not fussy.
Deadline: December 31st 2011 at midnight wherever you are.
Winner announcement: Within a week, to be added to the
Forever Nigella page.

There are:
No rules about how often you must take part
No rules about stuff being secret until certain dates
No rules that everyone cook exactly the same thing
No rules about not being able to submit to any other blog events – just check it doesn’t contravene the other guys’ rules

But there are 3 rules:
1. Blog your entry by the deadline including:
a) the current Forever Nigella badge
b) a link to the current host (ME)
c) a link to the official Forever Nigella page at Maison Cupcake:
http://blog.maisoncupcake.com/forever-nigella

2. So not to breach Nigella’s copyright you must NOT reproduce recipes verbatim as shown in her books. If using an original Nigella recipe, tell us which book it is from and/or where we find it online (see most likely sites below). If you’ve adapted the recipe in some way i.e. changed at least two ingredients or amended the method then it’s ok to publish the a recipe in your post but you MUST write the directions in your own words.

3. Tell us about your post by adding it to the Linky Tool below! I have made this into a Blog Hop so feel free to post the script at the bottom of your post to encourage your readers to visit the other entries. If you can’t see the linky below it’s because I’ve never done one before and I’ve stuffed it up. Nag me and I’ll sort it out.

Don’t forget to tweet your post with the hashtag #forevernigella – I will retweet all those I see!

Enjoy your Nigella Christmas presence!

Wednesday, July 27, 2011

A Sweet Collaboration

When I first started blogging, I often saw mention of how blogging brings people together and you can become friends with bloggers from all over the world. At that time, I couldn’t really grasp the thought, but now I know it is true. Blogging these past two years has not only allowed me to share some things in my life to you, but has introduced me to some fabulous people out there in the blogosphere.

One of my new friends is Tricia who writes and illustrates the blog Trillustrations. I stumbled upon Tricia’s blog almost two years ago and instantly became addicted. She has the cutest illustrations, many of which she generously shares for free on her blog. Of course, she is happy to create a custom illustration for you.

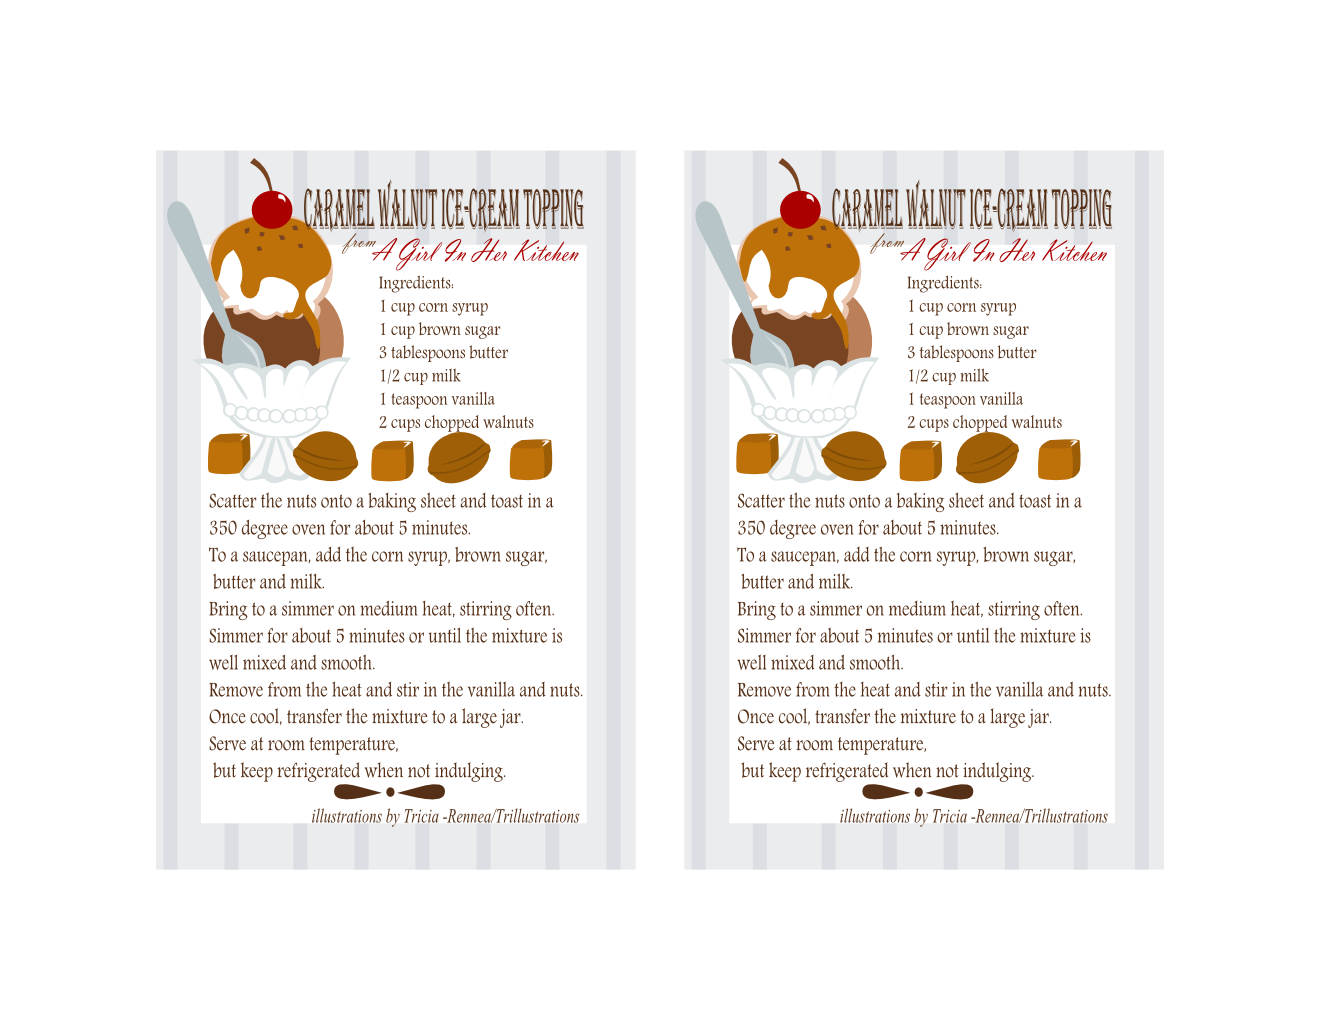
Together, we have a special treat for you. I’m sharing a delicious recipe and Tricia has created a lovely recipe card for it. First, the recipe…

Take your ice cream to the next level with this Caramel Walnut Ice Cream Topping!!


103_2159

It is sweet, crunchy and perfect with vanilla, chocolate and even coffee flavored ice cream. It’s also super easy to make, so make up two batches and share one with a friend. Tricia has made it easy to share this recipe; there are two per page!

 caramelwalnuticecreampagefixpng

Click on the picture to enlarge and print, or write to me at emcook17[at]comcast[dot]net for the pdf file.


Make sure to visit Trillustrations to see all of Tricia’s beautiful artwork. I know you’ll love her work as much as I do!

103_2148

I’m also linking this to Made It On MondayPolly Want A Crafter?, Today’s Creative Blog and Tasty Kitchen to share the love.

Thursday, July 7, 2011

Perfect Pork Chops


103_2045

Sometimes the best recipes also happen to be the easiest ones.  That’s the case with these fantastic pork chops.  It is really simple and the outcome is perfect in my opinion.  This is my go to marinade for pork chops.

Perfect Pork Chops

Ingredients:
2 lbs. pork chops
1/4 cup soy sauce
1/4 cup Worcestershire sauce
1/2 cup water

Place everything in a large Ziploc bag. Stash in the fridge until needed, at least a few hours, but overnight is even better.  If the liquid doesn’t completely cover the chops, turn the bag a few times to help things out.

Now how do you want those chops? Grilled?  Ok, then just grill them on high until the middle is no longer pink. 

Want something even easier?  Then forget marinating in the fridge and just put everything in the crock-pot and cook according to it’s manufacturer’s instructions. Turn them over about halfway through cooking.  SO easy!

These chops want to be served beside mashed potatoes and these peas.  Dinner is served, YUM!

Click here for the Printable Recipe at Tasty Kitchen. 

Linked to Made It On Monday.

Wednesday, June 15, 2011

Ice Cream Cupcake Contest 2011


ice_cream_cupcake_contest_2011

Coffee.  It fuels the world.  There are so many ways to enjoy it.  Most people I know put creamer and sugar in it.  Some like it with absolutely nothing in it, (I don’t know how they do it.  Gag!)  I myself cannot imagine drinking coffee without sugar and loads of milk.  My favorite coffee drink is the Double Shot from Starbucks, (I’m desperate to copycat that recipe), but cappuccinos and lattes are my alternate choices.   Lately, I’ve discovered that coffee ice cream has replaced chocolate as my go to frozen treat.  So when I decided to participate in the Ice Cream Cupcake Contest this year, I knew what I had to do.

My dream Ice Cream Cupcake is a combination of chocolate cake and cappuccino ice cream.  Throw in some chocolate chips and it’s a dream come true!  When I started thinking about the perfect Cappuccino Ice Cream Cupcake, here is what I envisioned:

A Chocolate Cupcake, Topped with Cappuccino Chocolate Chip Ice Cream.  Crowned with a Dollop of Whipped Cream and Chocolate Covered Coffee Bean.


Capuccino Chip Ice Cream Cupcake 2

That’s cute and all, but I felt that if I was going with the coffee theme, it needed to be a true cupcake and be either baked or served in a coffee mug.

103_1991

That’s better!  To make your own, bake your favorite chocolate cupcakes, adding a teaspoon or so of instant coffee granules to the batter.  May I suggest these cupcakes?  If you’re baking in a mug, you’ll probably have to add extra batter and baking time to the recipe. I used about 4 cupcakes worth of batter here.

103_1983

Another option would be to bake the cupcakes in silicone baking cups then unwrap them and place inside your favorite mug.

103_1984

I’ve topped mine with whipped cream and a chocolate coffee bean, but dusting with cinnamon or cocoa powder would also bring the café experience to these cupcakes.

103_2000

Cappuccino Chocolate Chip Ice Cream

Click here for the Printable Recipe at Tasty Kitchen.

Makes 1.5 Quarts
1 cup milk
1/4 cup ground coffee
1 cup sugar
3 eggs, beaten
1/8 tsp. salt
2-3 tsp. vanilla extract, depending on strength
3 cups half and half
1-4.25 oz. dark chocolate bar

In a saucepan, heat milk on medium-high heat until you see the first signs of bubbles, then remove from heat.  Stir in coffee and allow to steep for 3-4 minutes.  Strain the coffee grounds out of the milk using a fine sieve.  Slowly add the milk into the eggs, whisking constantly.  Return the mixture to the saucepan and add the sugar and salt.  Stir for 3-4 minutes over medium-high heat until the mixture thickens.  Add vanilla and 1 cup of the half and half.  Move the mixture to the refrigerator until chilled.  Meanwhile, chop the chocolate bar into small chunks and/or shards and set aside.  Once the mixture is chilled, add it, the chocolate, and the rest of the half and half to your ice cream maker and freeze according to the manufacturer's instructions.

The Contest:

The Ice Cream Cupcake Contest is host by Cupcake Project and Scoopalicious.  Judging with them are Nicole Weston from Baking Bites, Jessie Oleson from CakeSpy, and Naomi Robinson from Bakers Royale.  These three bloggers will also showcase their favorites on their own blogs

Prizes
The winner will be announced by July 1 and will receive an amazing collection of dessert cookbooks from some of our favorite authors!
From author
Krystina Castella:

From authors Bruce Weinstein and Mark Scarbrough:

From Nicole Weston, author and contest judge:

From Jessie Oleson, author and contest judge (to be delivered upon book release):

From Bakerella:

From Emma Hand, creator of Snap Stories and designer of our amazing new Ice Cream Cupcake Contest logo:

Wow! I’d love to win all of those, but even if I don’t, I’ve still got my ice cream in the freezer!

Linked to Made It On Monday.

Check out this at Brewed Daily.

And here is the link to all the entries.

Monday, April 11, 2011

Dressing Up Dinner: Sweet Peas

I have recently been on a quest.  A quest to find a great way to cook Sweet Peas.  You know, other than drowning them in butter.  Of course a little butter is ok. So, one day, I put a few things together and came up with a recipe for peas that I think I could eat all the time. 

103_1737

Dressed Up Sweet Peas
Serves 4
1-2 tablespoons butter
1  (15 oz.) can of Sweet Peas
1/2 cup chicken broth
Scant 1/2 teaspoon dried sage

In a small saucepan, melt butter on medium heat.  Add drained peas, chicken broth and sage to pan, stir and bring to a boil.  Reduce heat to low and simmer, stirring often,  for 10-15 minutes or until the liquid is mostly evaporated. 

Click here for the Printable Recipe at Tasty Kitchen.

Linked to Made It On Monday.

Thursday, March 31, 2011

Dessert Wars: Go Green

Dessert Wars


March’s Dessert Wars challenge is Go Green. To celebrate St. Patty’s Day and the color green, the challenge is to create a dessert using naturally green ingredients. We must use at least one traditional dessert ingredient and at least one non-traditional ingredient.

Traditional Non-Traditonal
Green Apples Cucumber
Green Grapes Green Tea
Limes Wasabi
Pistachios Green Chilies
Honeydew
Kiwi
Basil or other green herbs
Green Pears Soybeans/Tofu
Mint
Pandan
Vegetables like Spinach or Peas
Lemon Grass
Green Cheese
Avocado


My inspiration came to me in a funny way. I wasn’t sure what I was going to do for this challenge. Then one day I was adding wax to my Scentsy warmer. It smelled so good, and I realized that the scent was Cucumber Lime. Perfect! Now what to make with that? I settled on a granita, something I’ve never made before, but it’s so easy I don’t know why I haven’t yet.

Granita is a Sicilian dessert with many variations. It can either be coarse and crystalline or smooth and slushy. The technique I’m giving provides the coarse texture.


103_1592


Cucumber Lime Granita

Serves 4

Ingredients:

  • 1/2 cup sugar
  • 1/2 cup water
  • pinch of salt
  • zest of two limes, divided
  • 3 tablespoons lime juice (about 2 limes)
  • 2 cucumbers

Directions:

In a small saucepan, add the sugar and water. Swirl the pan to mix. Then bring to a boil on medium-high heat. Reduce to medium-low and simmer for 2 minutes to make a thin syrup. Take the pan off the heat and allow to cool to room temperature.

Now is a good time to zest and juice your limes. Then, using a peeler, peel the cucumber, cut off the ends and slice the cucumber in half lengthwise. Scoop out the seeds using a melon baller or a spoon. Chop the cucumber into smallish cubes until you have 2 cups.

Add to a blender the cucumber, lime juice, half the zest, salt, and 1/3 cup of syrup. Puree until it is nice and smooth. Pour into a shallow dish, cover and stick it in the freezer for 2 1/2 hours.

Remove the dish from the freezer, uncover and rake a fork through the mixture. Recover and return to the freezer for another 1-2 hours. Repeat the raking/freezing process every 1-2 hours until you are left with nothing but tiny ice crystals.

Serve in chilled glass vessels of your choice. Garnish with the remaining lime zest.

Pioneer Woman has a great step-by-step for making granitas. Check it out!


Click here for the Printable Recipe at Tasty Kitchen.


As February’s Dessert Wars Winner, I’m not currently eligible to win any more challenges until December. But I can’t leave you without showing you what this month’s winner will receive.


The March prize package includes:

Whisk and cupcake necklace from Moon & Star Designs

Beanilla Sampler Pack of Vanilla Beans

Lenox Personalized Musical Cupcake

1,000 ideas for Decorating Cupcakes, Cookies & Cakes

Organic Valley $50 Gift Certificate

Organic Prairie $50 Gift Certificate

Theme Kitchen $50 Gift Certificate

BEKA Cookware Crepe Pan


Click here to see the Dessert Wars rules


Lark's Country Heart