Monday, April 11, 2011

Dressing Up Dinner: Sweet Peas

I have recently been on a quest.  A quest to find a great way to cook Sweet Peas.  You know, other than drowning them in butter.  Of course a little butter is ok. So, one day, I put a few things together and came up with a recipe for peas that I think I could eat all the time. 

103_1737

Dressed Up Sweet Peas
Serves 4
1-2 tablespoons butter
1  (15 oz.) can of Sweet Peas
1/2 cup chicken broth
Scant 1/2 teaspoon dried sage

In a small saucepan, melt butter on medium heat.  Add drained peas, chicken broth and sage to pan, stir and bring to a boil.  Reduce heat to low and simmer, stirring often,  for 10-15 minutes or until the liquid is mostly evaporated. 

Click here for the Printable Recipe at Tasty Kitchen.

Linked to Made It On Monday.

Thursday, April 7, 2011

Tinker Bell Birthday Party


Cupcake

This weekend we celebrated Sophie’s 3rd birthday.  It became obvious to me a few months ago that Sophie’s obsession with Tinker Bell would provide the perfect theme for this party.  Our colors were Lime and Lavender to match just about every Tinker Bell item Sophie owns.   It was so much fun to plan!

We had the challenge of turning our church fellowship room into “Pixie Hollow”.  First let me show you “the backdrop”.  I had originally dreamt up something different, but it wasn’t going to work out.  My sister-in-law, Leigh, whipped this backdrop up the morning of the party to give a nice scene for opening presents.  Those are “fairy lights” aka white Christmas lights leftover from our wedding (they are used elsewhere too), a blue sheet and purple and green tulle tied with ribbon.  Leigh used thumbtacks to hold everything up.  This turned out so much nicer than what I had planned.
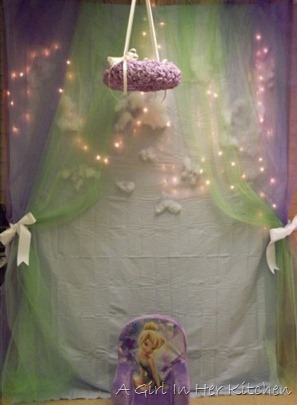
backdrop

Hanging above is a “wreath-a-lier” that I made.  It is a Styrofoam wreath form (14”) with crepe paper roses hot glued all over and hung with ivory ribbon.  Don’t ask me how many roses! This was definitely a labor of love.  I wish you could all see it in person as these pictures do not do it justice.  Good news is that I can use it to decorate for spring, so we will get a lot of miles out of this thing.

wreathalier

To use as table centerpieces, I bought six of these little $1 birdhouses from Jo-Ann’s Fabric.  Then I painted them brown and hot glued green Spanish Moss, also from Jo-Ann’s, to the roofs.  On three of them I made “Fairies Welcome” signs made from stuff from my yard.  The other three I left blank.  And that’s scrapbook paper they are sitting on. Now that the party is over, I’m using the scrapbook paper to make a mini Birthday Party scrapbook using a small photo album. The kids got to take the birdhouses home along with their goodie bags.  The girls got the ones with signs and the boys got the plain ones to be “bug houses.”  I meant to stick some flowers in the moss, but left them at home.  Oh, well.

cirlce bh

Speaking of goodie bags, here they are.  They are just brown lunch sacks that have Tinker Bell and friends printed on the front.  I can’t remember where these were bought, but I’ve seen them all over.  Behind them are more fairy lights with flowers attached. These were made by dying white coffee filters in water and food coloring.  After drying, I stacked four filters of the same color and pinched them in the middle and tied a twist tie around the pinch.  Then I fluffed the flowers and attached them to the lights with their twist ties.  It’s super easy!

flowers

The kids made necklaces with “Fairy Treasure”. 

103_1638_thumb[2]

The food table was a challenge. As you can see there is a plain brick wall behind the table.  Leigh and I hung streamers and white paper lanterns over the table.  More fairy lights grace the table behind the food.  Aside from the food I’m about to mention, we also had a fruit and veggie tray, dip and chips, and Starburst Jelly beans, which just happen to be the best jelly beans to be found on this Earth, just sayin’.

food

We served lemonade out of this cute dispenser bought for 6 bucks at Walmart.  It has a lovely pattern on it too, which worked well with the theme.  Behind it are the napkins I fanned into a wing pattern, don’t know if anyone noticed but it thought I was clever.  Punch cups for the adults and Tinker Bell cups and straws for the kids.  Leftover lanterns rest in a wire basket.

lemonade

Our choice of cookies were Oreos, to cater to a child with nut and egg allergies, and these cute flower shaped sugar cookies made using Nigella’s recipe and Wilton’s Royal Icing in Lavender to match our theme.

Cookie

I wanted to serve Tinker Bell inspired cupcakes, so I sketched a few ideas and settled on these two.  In the yellow baking cups (both ruffled baking cups made by Wilton) are Yellow Cake (from a box because I haven’t found my perfect yellow cake recipe yet).  The purple cups hold the most amazing chocolate cake ever (from Pioneer Woman).  Both are toped with That’s The Best Frosting I’ve Ever Had.  The chocolate cupcakes are iced to look like grass with purple wildflowers.  The yellow cupcakes just scream ‘Tink’ to me.  On top of the green swirl rests a pearlescent gumball from Party City.  It’s pretty and tastes good too!
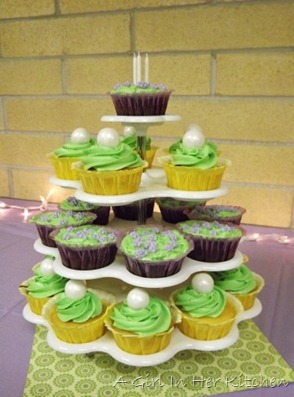
Cupcakes 1

I brought Sophie’s Tinker Bell costume which she had to wear for singing to her, blowing out the candles and opening presents. 

sophie and candles

We’re blessed to have a playground at the church building, so the kids got to play.  I think they had a good time.

playground

Sophie had a great birthday party, she’s still talking about it.  Now we just have to sit back and wait for a fairy to take up residence in our little fairy house. “Come on Tink, we’ll even share our jelly beans!”

Linked to Made It On Monday, Bear Rabbit Bear and Muffin Monday.

Thursday, March 31, 2011

Dessert Wars: Go Green

Dessert Wars


March’s Dessert Wars challenge is Go Green. To celebrate St. Patty’s Day and the color green, the challenge is to create a dessert using naturally green ingredients. We must use at least one traditional dessert ingredient and at least one non-traditional ingredient.

Traditional Non-Traditonal
Green Apples Cucumber
Green Grapes Green Tea
Limes Wasabi
Pistachios Green Chilies
Honeydew
Kiwi
Basil or other green herbs
Green Pears Soybeans/Tofu
Mint
Pandan
Vegetables like Spinach or Peas
Lemon Grass
Green Cheese
Avocado


My inspiration came to me in a funny way. I wasn’t sure what I was going to do for this challenge. Then one day I was adding wax to my Scentsy warmer. It smelled so good, and I realized that the scent was Cucumber Lime. Perfect! Now what to make with that? I settled on a granita, something I’ve never made before, but it’s so easy I don’t know why I haven’t yet.

Granita is a Sicilian dessert with many variations. It can either be coarse and crystalline or smooth and slushy. The technique I’m giving provides the coarse texture.


103_1592


Cucumber Lime Granita

Serves 4

Ingredients:

  • 1/2 cup sugar
  • 1/2 cup water
  • pinch of salt
  • zest of two limes, divided
  • 3 tablespoons lime juice (about 2 limes)
  • 2 cucumbers

Directions:

In a small saucepan, add the sugar and water. Swirl the pan to mix. Then bring to a boil on medium-high heat. Reduce to medium-low and simmer for 2 minutes to make a thin syrup. Take the pan off the heat and allow to cool to room temperature.

Now is a good time to zest and juice your limes. Then, using a peeler, peel the cucumber, cut off the ends and slice the cucumber in half lengthwise. Scoop out the seeds using a melon baller or a spoon. Chop the cucumber into smallish cubes until you have 2 cups.

Add to a blender the cucumber, lime juice, half the zest, salt, and 1/3 cup of syrup. Puree until it is nice and smooth. Pour into a shallow dish, cover and stick it in the freezer for 2 1/2 hours.

Remove the dish from the freezer, uncover and rake a fork through the mixture. Recover and return to the freezer for another 1-2 hours. Repeat the raking/freezing process every 1-2 hours until you are left with nothing but tiny ice crystals.

Serve in chilled glass vessels of your choice. Garnish with the remaining lime zest.

Pioneer Woman has a great step-by-step for making granitas. Check it out!


Click here for the Printable Recipe at Tasty Kitchen.


As February’s Dessert Wars Winner, I’m not currently eligible to win any more challenges until December. But I can’t leave you without showing you what this month’s winner will receive.


The March prize package includes:

Whisk and cupcake necklace from Moon & Star Designs

Beanilla Sampler Pack of Vanilla Beans

Lenox Personalized Musical Cupcake

1,000 ideas for Decorating Cupcakes, Cookies & Cakes

Organic Valley $50 Gift Certificate

Organic Prairie $50 Gift Certificate

Theme Kitchen $50 Gift Certificate

BEKA Cookware Crepe Pan


Click here to see the Dessert Wars rules


Lark's Country Heart

Friday, March 25, 2011

Pizza Mia

Back in February, my husband and I went to a youth conference in Gatlinburg, TN with some teens from church. We stayed in a townhouse that weekend, so we took advantage of having a full kitchen and I cooked all our meals. Well, that’s not entirely true. I wrangled everyone into helping. That’s right, I got teen guys to cook.

Here’s the details on planning the menu. First, I had to find out if there were any food allergies or special dietary needs. We had one vegetarian, but other than that all the others said they would eat anything.

Next, I decided on meals that were easy to prepare, and could be done in an assembly line. The desserts would be easy too. A lot of the ingredients could be used in multiple dishes too. Here’s our menu:

Friday Dinner: Hamburgers/Veggie burgers with all the good stuff you want on a burger, French Fries and Mocha Pudding for dessert. (Mocha Pudding deserves it’s own post, coming soon.)

Saturday Breakfast: Omelets in a Bag, muffins, and cereal.

Saturday Lunch: Quesadillas, Mexican Rice, Refried Beans, Chips and Salsa.

Saturday Dinner: Pizza Mias, Gooey Butter Cake.

Sunday Breakfast: Pioneer Woman’s Cinnamon Rolls with How Sweet Eats’ Vanilla Cream Glaze, muffins, cereal.

Before going, I made sure that I had as much prepared as possible. Meats cooked, muffins made, ingredients mixed. Hey, I didn’t want to spend the whole weekend in the kitchen. It worked out really well. I’m so proud of how organized I was. Friday night after dinner, I had everyone mix up their omelets and store in the fridge overnight. That made Saturday morning go smoothly. I was so proud of our teens. Not only did they help me out in the kitchen, but by the end of the weekend were taking the initiative in getting food ready. You don’t see that everyday. Thanks guys!

Anyway, here is a recipe that is a crowd pleaser. Nothing fancy here, just something incredibly easy that can be adjusted to your tastes and easy to serve to a large group. We call them Pizza Mias, not just because they are personal pizzas, but because the recipe was given to me by my friend Mia. Here’s what you need:

  • Sub rolls
  • Marinara sauce
  • Your favorite pizza toppings
  • Shredded Mozzarella cheese, or whatever cheese you prefer for pizza
  • Aluminum foil to keep you sane

Preheat your oven to 400 degrees. Line a baking sheet with foil. Slice the rolls into two halves if not already sliced.

103_1547

Add your sauce.

103_1548

Then lay on the toppings.

103_1551

Now the cheese.

103_1554

Now stick it in the oven for 10 minutes or so until the cheese has melted. See how easy that was, I kinda feel goofy for spelling it all out for you, it’s such a no brainer.

103_1557

Mia suggests that for a large crowd, use multiple pans so they are ready to go as soon as another comes out of the oven. She also sticks to just 3 options, cheese, peperoni, and sausage. Get an assembly line going and it couldn’t be easier!

Thursday, March 10, 2011

Warrior


pain_au_chocolate_warrior


I hope you will allow me bragging rights here.  I have won February’s Dessert Wars with my Pain au Chocolat.  This means, not only have I won a great prize package, but I have a spot in December’s Ultimate Competition.  I’ll be going up against ten other Dessert Warriors, eleven runners-up and anyone who participated in all eleven challenges.

Because I’ve already won a challenge, I’m ineligible to win any other challenges until December, but I will still be participating each month to challenge myself and to use each challenge as warrior training.  Winking smile

If you have a blog and you want to challenge yourself in the dessert arena, go take a look at dessert-wars.com and join the fun!

Congratulations to February’s Runner Up

BriarRose of Flour Dusted

who made 

Dark Chocolate and Lemon Bundt  Cake

f11ru

Click here to see February’s Dessert Wars Round-Up.

Monday, March 7, 2011

Just Peachy

Here’s another recipe from Nana. Peach Cobbler is one of my favorites, not only because it tastes so good, but because it is simple to make. It would be great as an impromptu dessert, to take to a potluck, or give away to a lucky friend. (A cute little loaf pan such as in the photos can be found many places. Mine came from Michael’s a few years ago, but I’ve seen them all over. They are perfect for gift giving.)

pc1

Yummy with vanilla ice cream!

Nana’s Peach Cobbler

3/4 stick margarine 1 teaspoon cinnamon
1 cup milk 1 (29 oz.) can sliced
1 cup self-rising flour peaches with syrup
1 cup sugar

Place margarine in a 9x13 casserole dish and melt in oven at 350 degrees, (I do this while the oven is preheating). Mix milk, flour, sugar and cinnamon together. Pour mixture into the dish with the melted butter. Evenly arrange the peach slices on top of the batter. Pour the syrup from the can over the entire pan. Do not stir! Bake for 30 minutes.

pc2

It’s divine with a little cream poured over!

Click here for the Printable Recipe at Tasty Kitchen!

Monday, February 21, 2011

Milk and Cookies and Milk

103_1380

Here’s a recipe I found on Tasty Kitchen that I wanted to share with you. It’s for Lactation Cookies. These cookies include ingredients said to increase the nursing mom’s milk supply.

Peaceful Parenting has a nice post telling you about the benefits of oatmeal, flax and yeast in increasing milk supply. Check it out here.

I thought these were some pretty yummy cookies. I diverged from the original recipe by using margarine instead of butter, adding more chocolate chips and because I didn’t have fresh yeast I used 1 1/2 tablespoons dried yeast. I also think that because of the effect the flax has on the finished cookie, these are best on the crispy side. I left them in the oven a little longer to do this, and probably the margarine helped them spread well too. You can store these in a plastic freezer bag. Take one out of the freezer and microwave about 10 seconds before enjoying. Eat at least 1 a day for the milk increasing benefits.

Here’s where you can find the recipe. Of course, if you’re concerned about your milk supply, finding a good Lactation Consultant and/or a breastfeeding support group will be very important. A Lactation Consultant will make sure your baby is getting a proper latch, getting enough milk, and can help with other nursing troubles too.

StarIf you have other family members jealous of your special cookies, by all means share! You don’t have to worry about your husband or children spontaneously lactating. They can benefit from these healthful ingredients too!

103_1381